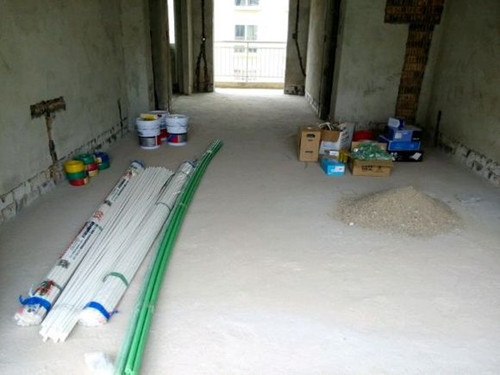
How to check the water and electricity materials ? Prior to the start of the hydropower reform, it was necessary to purchase materials and enter the site. The entry of hydropower materials means the beginning of decoration construction, and the acceptance of hydropower materials must be strictly controlled. For example, the quality, specification and quantity of hydropower materials must be consistent with the procurement contract. In addition, good materials have to be installed. What are the norms for the installation and transformation of hydropower? What problems should be paid attention to when installing hydropower? Let's take a look at the relevant knowledge of hydropower materials below.

Water and electricity materials approach considerations
Hydropower is usually the first item of formal construction. The entry of water and electricity decoration materials means that the decoration has entered the construction phase. The quality of materials at this stage has a crucial influence on the final effect of hydropower reform. In the renovation, many owners and decoration companies, building materials business disputes are largely due to the quality of the material. In order to reduce disputes in home furnishings and to ensure that the materials used meet their own requirements, the owners should exercise strict control over the decoration materials when they enter the market.
Water and Electricity Material Acceptance Process
The majority of owners must do material acceptance when the water and electricity decoration materials come in. The acceptance procedure must be strict. The inspector should perform necessary inspections on every type of water and electricity materials that come in, such as whether the material quality, specifications and quantity are related to procurement. The contract is consistent.
1. Notify the construction party of material acceptance
The acceptance of materials is best arranged as soon as the material enters the market. Therefore, the agreed acceptance time is very necessary to avoid material entry and there is no time agreement to accept the materials and affect the construction progress.
2. The acceptance personnel specified in the contract must be present when materials are accepted
The home improvement contract stipulates that after acceptance of the materials, the inspector must sign on the site to avoid unnecessary troubles or disputes later. In material acceptance, the decoration company will inform the customer to see the site and the supervision and supervision will give them guidance and guidance. The owner can also check on the spot with the contract, quotation, and ruler.
3, the acceptance procedure must be strict
The inspector shall perform the necessary inspections for each material contract specified in the contract, such as material quality, material specifications, and material quantity.
4, after the acceptance of acceptance on the acceptance form
If the inspection result material is qualified, the acceptance person should sign the material acceptance form. This is a more complete process. This is because if the material was checked at the time of material arrival, the necessary procedures were not performed at the time. Afterwards, they repented, and they refused to accept the result of their acceptance. However, since the other party has no evidence in hand, there is no way to do so.
Concrete material acceptance method
1, cement acceptance
Check whether the factory certificate of cement is in accordance with the package, including the name of the factory and product, type, label, code, serial number, and date of packing. You can also focus on checking the factory inspection report. This report is divided into 7 days and 28 days. Generally, the 7-day inspection report is taken with the goods. Attention should be paid to the 28-day inspection report. Bulk cement should be submitted with the same content of the card and the bulk of the card and bulk bin number; to accept the quantity and weight. The net weight of cement is (50±1) kg.
2. Acceptance of wire and wire materials
First of all, see whether there is a quality system certification, whether the certificate of compliance; see if there is a factory name, site, site, production date; see if the wire is printed with trademarks, specifications, voltage and so on. Looking at the cross section of the copper core of the wire, the superior copper has a bright color and a soft color. Specifically:
A look at the logo: product certification should be marked with the name of the manufacturer, product model, rated voltage and other signs, and wire surface marking and product certification should be marked both should be consistent.
Second, look at the appearance: smooth appearance of wire appearance, no damage to the insulation and sheath layer, bright color, logo printing clear, fine texture, hand-mold wire no greasy feeling.
Third, look at the actual length and thickness: In the relevant standards, the error of the length of the wire must not exceed 5%, and the diameter of the cross-section must not exceed 0.02%.
3, pipe pipe acceptance
Look at the surface of the pipe body is smooth, the surface of the inferior product will have edges and edges, rough work; look at the cross-section of the pipe mouth, the thickness of the pipe wall is uniform, the thickness of high-quality cold water pipe is generally more than 2.3mm, hot water pipe generally On 3.5mm. Specifically:
A smell: smell the water pipe has no smell. There are many pungent odors in the smuggled toxic plastics.
Second, look at the color, thickness, and glossiness of the pipe. If the outside wall of the pipe is marked with the trademark, specifications, temperature, pressure, production lot number, date of production, and actual origin, the aluminum plastic pipe depends on the thickness and evenness of the aluminum layer. See if there is a health permit. Water pipes without a hygiene permit cannot be used for drinking water pipes.
Third, pay attention to: First, we must pay attention to the regular authorized distributors of pipe materials to buy franchise stores; Second, we must pay attention to the purchase of pipe, pipe fittings is the same manufacturer; Third, pay attention to obtain product service cards.
Hydropower installation knowledge and hydropower installation specification
Hydropower installation specification content:
1) The principle of wiring: horizontal and vertical. Use special PVC insulation PVC pipe, the line pipe must be fixed in the line slot, the line box and the line pipe should be used when the lock mother, straight pipe every 80 cm using a pipe Card, use a tube card every 20 centimeters around the corner.
2) Socket is in the upper part of the wall, slot vertically upwards in the wall, to the top of the wall to install the decorative line in the installation line, if it is in the lower part of the wall, vertically downwards to the bottom of the installation skirting board, slotting depth Should be consistent, slot line and top straight line should be ejected after the control line in the wall, and then cut the wall surface with a cutting machine, slotted with a machine.
3) When using Zhongcai PVC pipe, use spring bending at the elbow, do not use 90-degree elbow and tee (at this point we basically do not have this kind of situation), line installation must be sheathed Glue is used for connection. The edge of the casing shall be tightly closed. Flat and smooth. The right angle shall be cut at the inside of the corner. After the arc-shaped interface is cut at one side of the incision, it shall be bent and installed.
4) The depth of the pipe thread is moderate and there is no burr. The pipe joints are wrapped with raw material and wrapped 5-6 turns. The number of pipe twisted teeth is 5 teeth-6 teeth until the joint is tightened, and rotten teeth are not allowed to enter the pipe.
5) After the wire is installed in the casing, the wire fixing tool should be used. After the wire is fixed in the wall and the wall, the plaster is concealed.
6) It is strictly forbidden to lay the line pipe directly under the composite plate. (At this point, we have not done a good job at the moment. After that, we will communicate with the customer well. The composite floor must be grooved.) The line pipe under the solid wood floor There must be reinforcement measures.
7) It is forbidden to lay the conduit on the floor of the kitchen or bathroom to prevent water from penetrating into the conduit. (There can't be any wire on the floor of the bathroom. At this point we have to step up.)
8) The conductors that enter the conduit should not be more than 40% of the hole area of ​​the conduit. The conductors in the conduit must not have connectors. Conductors of different applications must not be mixed in a conduit.
9) The wire must enter into the cable box to ensure that it has a certain length, leave 10 to 15 centimeters, leave 100 centimeters of sound, and wear hoses to install and maintain the switch and socket.
10) The water pipe should be 1.5 cm away from the wall, left hot and right cold, 15 cm apart.
11) The parallel distance between the wire and the water pipe should not be less than 30 cm. The crossover distance should not be less than 10 cm.
12) There must be no joints at the wire points and points, and the dark lines in the ceiling must be protected by flame-retardant tubes.
13) After the acceptance of the hydropower is passed, the powder groove and wall groove can be applied with 1:3 cement mortar to fill the density (should be divided into two levels of powder wall.)
Power system construction process requirements
1) Each household should be provided with separate distribution box, distribution box installation location, leakage box installation location: should be installed in an easy-to-operate location for easy maintenance.
2) The leakage circuit breaker shall be installed in the distribution box. The leakage current shall not exceed 30mA, and the overload and overvoltage protection functions shall be provided. The points shall be routed and the lighting, air conditioning and socket shall be separately controlled. The loop shall ensure the normal use of the load. The bottom of the box should be 1.8 meters wide from the ground. The position of the original distribution box is generally not shiftable. If it is necessary to shift it, a transition box shall be added. The design and supervision shall be used to determine the plan. The construction can be carried out under the guidance of supervision.
3) The circuit is arranged so that the air conditioners are all the same way, so the lighting is all the way, the kitchen socket is all the way, (the kitchen, bathroom single socket, bathroom power facilities and bathroom sockets are all the way, except for the kitchen, the other than the ordinary socket For all the way, different room types can refer to the above method.
4) The neutral line of the two routes, the ground line cannot be shared. The two routes cannot be worn in the same pipe. The parallel distance between the wire and the heating, hot water, and gas pipes should not be less than 300mm, and the crossing distance should not be less than 100mm.
5) At least 60A is required for home opening, 40A for living room and air conditioning.
6) The bathroom installation Yuba should be split separately. The diameter of the cable is 2.5mm square. When installing the electric water heater in the bathroom, separate shunts are needed. The capacity is large and the line is determined to be small, generally about 2.5mm square and 4mm square.
7) Kitchen power: The kitchen needs separate shunt wire diameter 2.5mm square.
8) The need for additional shunts to control more than 25 common sockets and fixtures.
9) Conduct color mark: The distribution box and each circuit wiring need to be color coded.
10) When wiring, the colors of the phase line and neutral line should be different, the color of the same residential line (L) should be uniform, the neutral line (N) should be blue, and the protection line (PE) must use the yellow-green line. The joints that penetrate the pipe conductors should be located in the junction box. The joints should be firmly connected and the insulation tape should be wrapped evenly and tightly.
11) Carry out civilized construction, regulate construction, speed up construction, and give the whole project a good start.
Technical requirements for construction of weak systems
1) The telephone must be laid with a special telephone line threading pipe, and cannot be mixed with other lines.
2) The TV cable line must use the coaxial cable (width 7.5II) that meets the requirements and must not be docked. The bend radius of the cable network line is > or =8D (R is 64MM).
3) It is forbidden to mix TV cable cable with the network cable.
4) It is forbidden to lay the strong and weak electricity in the same pipe and not to access the same junction box.
5) The distance between strong and weak wires should be greater than 15mm. Signal lines such as telephone lines and television lines cannot be routed in parallel with the wires.
6) For installation below four terminals, use a divider (distributor). The distribution must be installed in the 120-type large box (TV box) to reduce the loss of the level signal and at the same time be easy to maintain.
7) Conduct a power-on experiment to check if the working status of all electrical components is normal.
8) Keep the length of the audio cable outlet convenient for later displacement (it should be enough for 1 meter) and protect it.
9) After completion, an electrician draws a circuit diagram (electrical layout plan, system diagram). (We did not do enough on this point. We must do this later.)
10) The electrician must be equipped with a certificate, equipped with standard electrician tools.
11) The electrician must wear insulated shoes while working. It must be operated by two or more people. It is strictly forbidden to wear shorts for work and civilized construction.
Lamp installation process requirements
1) The most basic requirement for the installation of lamps is firmness.
2) When installing lamps such as wall lamps, bedside lamps, desk lamps, floor lamps, mirror front lamps, etc., the metal shells of lamps with a height less than 2.4m shall be reliably grounded to ensure the safety of use.
3) When the bathroom and kitchen are equipped with low-profile lampholders, the ceramic screw base lamp wiring should be used. The phase wire (switching wire) should be connected to the center contact terminal, and the neutral wire should be connected to the screw terminal.
4) Lamps with switches, such as table lamps, shall have no exposed metal parts for safety reasons.
5) When installing various types of lamps and lanterns on a decorative ceiling, install the lamps in accordance with the requirements of the installation instructions of the lamps. The weight of the lamps should be more than 3kg. Use a pre-embedded hook or directly fix the hanger with a bolt from the roof. Hanging wooden keel bracket to install lamps). It must not be hung on the adjacent water pipes or electric pipes and must be independently hung. The wire from the lamp box box is protected by a hose to the lamp position to prevent the wire from being exposed in the flat top.
6) Light fixtures can be hung on the existing or additional large and medium keels but must be reinforced. It is forbidden to hang on air conditioning ducts, water pipes and electric pipes.
7) Rows of luminaires must be horizontal and vertical with a tolerance of no more than 3mm.
8) The wires connected to the luminaire in the ceiling shall be protected by hoses and shall not be bare wires.
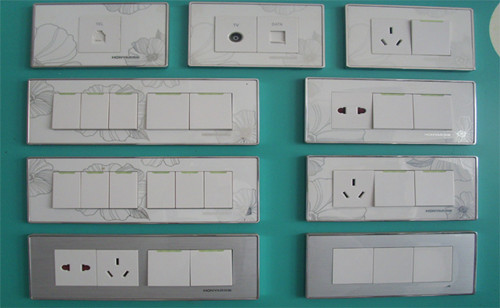
Switch, socket installation process requirements
1) Determine the relative positions of switches, sockets, and fixtures based on the design and customer program requirements.
2) The sockets and switches shall be firmly installed with no gaps around; the phase line and neutral line facing the power socket shall be zero to the right, and the socket with grounding holes shall be used. The other line plugs shall be at the upper position and the grounding shall be reliable.
3) The socket should not be less than 200mm from the ground. The sockets installed in the same room shall use sockets for protection against electric shocks; the height of sockets installed in rows shall not exceed 2mm.
4) The switch and socket are clean and free of stains. For sockets installed under 1.5m, sockets for defensive electric shock protection shall be used; the lead in the box shall have a margin and the length shall be 150mm. When wiring, the phase wire enters the switch, and the zero line enters the lamp directly. The phase of the screw cap lamp should not be connected to the housing.
5) The height of the light switch from the ground should be 1.3m, and the distance between the switch and the socket should be 150-200mm. The switch should not be installed behind the door.
6) There should be no sockets or switches below the large water outlet. There is a 20mm left and right distance.
7) The position of the switch should correspond to the position of the lamp and the same direction of the switch in the same room.
8) The cassette must be flat and cannot go beyond the plane of the wall. The switches and sockets on the wooden material must be connected to the bottom of the panel. The line tube should be lower than the wall plane, and the cassette nut should be connected with the cassette. The switch and socket must be on the same level.
Finished product protection
1) Do not touch the wall when installing the switch or socket. Keep the wall clean.
2) After the switches and sockets are installed, do not spray them again to keep the panels clean.
3) Do not touch the switch or socket when the other work is under construction.
Should pay attention to the quality problem
1) The panel of the switch and socket is uneven and there is a gap between the surface of the building and the building. After the panel is adjusted, tighten the fixing screws so that they stick to the surface of the building.
2) The switch is not open phase, and the phase, neutral, and ground lines of the socket are crimped and should be corrected as required.
3) The multi-lamp room switch does not correspond to the control lamp sequence. When wiring, the conductors of the lamps of each road should be carefully subdivided, crimped in order, and the switching direction should be consistent.
4) The screws fixing the face plate are not uniform (a word and Phillips screws). For aesthetics, uniform screws should be used.
5) The difference between the installation height of switches and sockets in the same room is beyond the tolerance range and should be corrected immediately.
6) The connection of the head of the switch and socket box shall be changed to the total head of the wire connected by the chicken claw, and then the branch wire shall be connected to the switch or socket head. Or use the LC safety crimping cap to crimp the header and then branch to make wire connections.
Sanitary ware installation process requirements
1) The outer surface of the sanitary appliance is clean and free of damage, and the installation is firm and stable without loosening; the joints shall be sealed without leakage; the valves shall be flexible and switchable. After the installation is completed, no less than 2 hours of water test no leakage, water volume are as follows: toilet water tank should be filled to the following 10MM; all kinds of wash basins, wash basins should be filled to the overflow; bath should be Sheng to Not less than one third of the cylinder depth.
2) The toilet installation; before installation, the toilet shall be inspected for damage, cracks, and the inlet hole and drain outlet shall be unobstructed; if it does not meet the quality requirements, it shall not be blindly installed. Toilets should be installed in a stable, upright position in the toilet cubicle. The position should be correct and the horizontal level should be used to adjust the level.
3) Floor drain installation: The floor drain should be installed at the lowest level of the ground. Its elevation should not exceed the ground, and it must not be less than 5 mm below the ground.
4) The central longitudinal distance of the drainage hole of the squat type stool is not less than 540mm from the wall surface: The center of the drainage hole of the sitting type stool is not less than 420mm from the wall surface, and the height of the seat from the ground is 300mm: Washbasin Installation: Wash and wash hands The margin of the basin is about 800mm; the upper margin of the tub is not more than 520mm from the ground.
5) Washbasin installation: washbasin basin mouth 800MM above the floor, the basin installation bracket should be close contact, there must be no loosening. The basin is calibrated with a horizontal ruler and the horizontal deviation is less than or equal to 2mm. The connection of the triangle valve and washbasin faucet is tightened with steel pipe.
6) There must be no defects such as convex and convex deflections in the water supply connection pipe of the sanitary appliance.
7) Sanitary appliances should be fixed firmly. Do not use expansion bolts to secure sanitary fixtures in perforated bricks or light partitions.
8) Sanitary appliances and all kinds of water supply pipes should be leak-proof when they pass through the floor. After passing the inspection, they can be put into the next working procedure.
9) Sanitary ware should be protected from bumps during handling and installation. After the installation of the sanitary ware, the protective material for the outlet of the sanitary ware is used to read the plug, and the chrome-plated parts are wrapped in paper to prevent clogging or damage.
10) When removing the holes in glazed tiles and terrazzo walls, it is advisable to use an electric drill or lightly remove the glaze with a small tweezers until the bottom of the brick is available. However, it must not be too fierce to avoid the surface layer ticking. Broken or shocked empty drum phenomenon.
11) After the sanitary equipment is installed in a stable manner, in order to prevent the parts from being lost or damaged, the accessories should be installed uniformly before completion.
12) The installed sanitary ware should be protected to prevent damage to the ware porcelain and damage to the entire ware.
13) Before the water test, check whether the floor drain is unblocked and whether the valve of the household is closed. Then carry out the same water test according to the division of the floor in order to avoid water leakage and damage to the decoration project.
14) In the winter season when indoor heating is not available, all kinds of sanitary ware must be drained. There should be no accumulation of water in the trap, so as to avoid freezing the sanitary ware and traps.
Should pay attention to the quality problem
1) The toilet is uneven and tilts left and right. Reason: When installing, the bricks on the front and the sides are not solid. After the coke filling, there is no inspection. After the plaster is not repaired, the water tank and the toilet are not aligned.
2) High and low water tank pulls and mops are not flexible. Reason: When the internal and external components of the tank are installed, the position of the three main components in the tank is unreasonable. High water tank inlet and pull handle should be placed on the same side of the tank. In order to avoid interference with each other.
3) Parts of the chrome-plated surface are destroyed. Cause: Pipe clamps are used during installation. Use a flat wrench or a homemade wrench.
4) The toilet bowl is out of alignment with the center of the back tank. Cause: The misalignment is not correct, the toilet is not installed correctly or the stowage box is stabilized first, and the toilet is then stabilized.) The toilet bowl is off the ground around. Cause: The water outlet is over-reserved and has not been repaired before being installed.
6) Vertical urinals are too big from the wall. Cause: The fling size is not accurate.
7) Sanitary ware overflow failure. Cause: No overflow eyes at the water outlet.
8) Before the water is drained, the dirt inside the appliance is cleaned. The water and electricity installation specifications all come from national standards and industry standards. The main ones are: GB50303-2002 <Construction Electric Engineering Construction Quality Acceptance Specification>, GB50242-2002 <Building Water Supply and Heating Engineering. Acceptance Code for Construction Quality>, GB50243-2002 <Code for acceptance of construction quality of air-conditioning engineering> (Specification of air-conditioning piping is much stricter than ordinary water supply), GB50166-200 <Specification for Construction and Acceptance of Automatic Fire Alarm System>, GB50339-2003 <Intelligent Building Engineering Quality Acceptance Specification> GB50134-2004 <Construction and Acceptance Criteria of Civil Air Defense>, GB50254~59-96 <Electrical Installation Installation Construction and Acceptance Specifications>, GB50150-91 <Electrical Installation Installation Engineering Electrical Equipment Transfer Test Standard>, GB50235-97 <Code for Construction and Acceptance of Industrial Pipework>, GB50411-2007 <Code for Acceptance of Construction Quality of Building Energy-saving Engineering>, Industry Standard JGJ46-2005 <Technical Specification for Temporary Power Supply of Construction Site>, GB50261-2005 <Automatic Sprinkler System Construction Quality Acceptance Specification> Drainage PVC Pipe GJJ/T29-98, Plastic Water Supply Pipe GB/T50349-2005.
Editor's summary: The above is the introduction of the acceptance process of hydropower materials and the relevant matters needing attention. I hope to help friends who have this need! For more information, please continue to pay attention to our website, follow-up will show more exciting content.
Waterproof Acceptance Wall Acceptance Doors and Windows Acceptance Ground Acceptance Level Acceptance Hydropower Materials
Miscellaneous Spare Parts For Escalators
Miscellaneous Spare Parts for BLT Escalators, Xizi Escalators, CANNY Escalators, SJEC Escalators, KOYO Escalators, IFE Escalators, SELOON Escalators, HOSTING Escalators, Estilo Hosting Escalators, IMEM Escalators, KLEEMANN Escalators, Doppler Escalators, ORONA Escalators
BLT Escalator Spare Parts, Xizi Escalator Spare
Parts, CANNY Escalator Spare Parts, SJEC Escalator Spare Parts, IFE Escalator
Spare Parts
We can help you with high quality Miscellaneous Spare Parts
for BLT Escalators, Xizi Escalators, CANNY Escalators, SJEC Escalators, KOYO Escalators,
IFE Escalators, SELOON Escalators, HOSTING Escalators, Estilo Hosting
Escalators, IMEM Escalators, KLEEMANN Escalators, Doppler Escalators, ORONA
Escalators
We are the leading manufacturer & supplier of BLT Escalator Spare Parts, Xizi Escalator Spare Parts, CANNY Escalator Spare Parts, SJEC Escalator Spare Parts, IFE Escalator Spare Parts, Original Parts Guaranteed
Contact us TODAY for more Miscellaneous Spare Parts for BLT Escalators, Xizi Escalators, CANNY Escalators, SJEC Escalators, KOYO Escalators, IFE Escalators, SELOON Escalators, HOSTING Escalators, Estilo Hosting Escalators, IMEM Escalators, KLEEMANN Escalators, Doppler Escalators, ORONA Escalators
Miscellaneous Spare Parts for Escalators, Toshiba Escalator Spare Parts, SJEC Escalator Spare Parts, KOYO Escalator Spare Parts
CEP Elevator Products ( China ) Co., Ltd. , https://www.zjelevatordoorsystem.com